Monday, December 27, 2010

Merry Christmas Tree!

I was having trouble posting this over the last few days, but I was finally able to get it posted.
My final Christmas project for this year was a Christmas tree I designed myself! This adorable tree decorated with poinsettias and lights stands 27.5 inches tall and was a delight to make!


First I started by deciding on how I wanted the poinsettias to look. I created them all in one piece, using the flower loom and Homespun candy apple red yarn. But they came out looking more like a star (the one on the left), and they weren't the right color. I tried again, increasing the number of leaves and using red heart red yarn. Now it looked more like a poinsettia to me (the one on the right):


I knit 20 poinsettias and set them aside.
To knit the tree, I used Homespun Evergreen Christmas yarn and every round loom I had. I knit each section of the tree from small to large, and then sewed them together with yarn. I knit the bottom section of the tree a little longer than the cone so I could pull the tree taut against the cone and cinch it underneath.


After I completed it I thought of a different way of creating the tree in one piece; maybe next year I'll try it out and see if it works.

To assemble the tree, I purchased a clear plastic cone from an online craft store to use as the inside of the tree, because I knew styrofoam wouldn't work well with the lights. Plus I didn't want the color of the styrofoam to show through the knitting. I bought a wood dowel and painted the bottom part of it brown, to use as the tree trunk. I bought a strand of 20 red Christmas lights. Then I bought some styrofoam discs that I would cut to insert and glue inside the bottom of the tree and into the base of the pot, to hold the tree steady and upright.

Before I put the lights in, I sewed the poinsettias onto the tree. This could have been a big mistake, since I didn't take into account the distance between each light bulb -vs- the distance I had sewn on each poinsettia. But fortunately all of the lights were able to reach the centers of eack poinsettia as I had planned.
Another problem with sewing the poinsettias on the tree first happened when I had to space and match each light with the center of each poinsettia I had sewn on. I had to use an exacto knife to mark the center of each poinsettia on the plastic cone. Then I enlarged the hole in the plastic cone and pushed each light through. Then I secured the lights using black electrical tape, which I knew would be covered up by the poinsettia.
Next I carefully turned the tree inside out, and pushed the lights through the center of each poinsettia, starting at the top. This was difficult, but not impossible. I poked a pencil through the center of each poinsettia to guide my finger and to make the hole big enough for the light to push through. The ones at the top were the hardest, but after the first few I was able to position the lights both inside and outside the cone through the yarn.

At first I had planned to knit the star on top of the tree. I was going to make a large poinsettia for the top, but I just wasn't getting a good design together for how I wanted it to look. So I found a star at the craft store to use instead.
The last part I bought was the pot itself: a cute wicker basket that I found at the craft store, in the shape of a snowman's hat. It was just the right finishing touch!
Here is what the tree looks like with the lights on,
and an artistic rendering of it:


Hope you and your family had a wonderful Christmas!

Wednesday, December 15, 2010

Christmas Ornament #2

Here is another ornament I created this year:


A Christmas wreath with tiny holly "berries" woven into it - red yarn sewn through. I put the wreath inside the bulb before adding the holly leaves. It was a task but worth the beautiful result when it was done. The yarn is Red Heart Paddy Green, and Red. I bought the holly from either a local craft store or a mail order catalog, I don't recall which right now.

Santa!

Phew! I finally finished helping Santa write his letters and send them out to good little children all over the U.S.! He does this via his website, www.SantaLetterForChristmas.com. Every year I help Santa with this task, and the deadline for sending out the letters just passed. Back to knitting!

Thursday, December 2, 2010

2010 Christmas Ornament #1

Here's my first Christmas project for the year: a glass bulb with a knit wreath inside!


It was simple to make, using the spool loom and carefully inserting it inside the bulb. Then I glued some fancy ribbon I bought from Michael's around the top. I already gave it to someone as a gift.
I bought a few miniature bulb ornaments from one of my favorite places to order from, http://www.factorydirectcraft.com/ . I can sit and stare at their catalog, drooling at the thought of all the wonderful projects I could make! The miniature bulbs are hanging inside from the top of the wreath.
It's always fun to see people's reactions when they see the ornaments. They wonder, "How did you get that inside there?" Practice, practice, practice!

Wednesday, November 24, 2010

HAPPY THANKSGIVING!

to one and all! See you after the holiday with Christmas crafts!!

Friday, November 12, 2010

No more pumpkins for now

I thought I was going to create another pumpkin pattern, but I was so happy with the way the first one came out I didn't try to make any more!

I started working on a few Christmas crafts and I look forward to posting the new projects over the next few weeks.

In the meantime I made a hat for a friend of mine based on the pattern for the Popcorn Bobble Hat from page 14 of the book, "Learn New Stitches on Circle Looms" by Anne Bipes. Instead of the white hat pictured in the book, she wanted black. Here's how it came out:

It's a little harder to see the popcorn bobble pattern in black in a photograph without making the photo so light that it washes everything out. My friend loved it very much.

Thursday, November 4, 2010

Frog & Company

Here's a photo of my frog on the altar, just like I said I would post. Do you see mine?:


These are just a few of the many frogs that were up there. You can watch my pastor's sermon series on "The F.R.O.G. in the Swamp" here:

http://www.stonecrestcommunitychurch.org/OnlineMessages_092610.php The series begins on September 26 and concludes on 10/31/10.

Sunday, October 31, 2010

Trick or Treat

It was my daughter's first year officially trick or treating, and she was going to be dressed as Princess Tiana from Disney's The Princess and the Frog. I have to say that the Tiana costunes we saw at our local stores were very cheap looking and certainly not durable. The first one we looked at would have left our daughter's back almost fully exposed. Just what we needed, a princess with a cold because of a skimpy costume. The second version of the costume we saw had more covering, but there were no sleeves on the dress. After much debate we finally bought it.

Naturally, we stopped by the Dismey store at the mall and saw the perfect Tiana dress, nicely made and much prettier, of course for $20 more. We decided to stick with the dress we already bought.


As a result, I decided to quickly make a shrug to help keep my daughter warm as she went from door to door. I used Baby Bernat green, yellow, and white to give it a soft tone to match the dress, and some Lion Brand Fun Fur for the cuffs.


After a few measurements, the shrug came together nicely. Whipping it up on such short notice didn't give me much time to check if it fit her properly and it wound up being a little tight around the armpits. But now that I have the pattern down I will make a nicer more durable one for her to wear at other times. I'll just make it a sweater instead of a shrug. Next time I will add Fun Fur to the bottom hem and maybe the neckline, though it might be too tempting for her to nibble on it around her neck. She loved it just the same.

First Pumpkin

I completed my first pumpkin! And I'm so happy with how cute it came out! I love how it has the ridges just like a real pumpkin! I have to say this is probably one of the cutest projects I've ever done. As soon as I saw it when it was finished, I said, "Awwww." And it was so simple to make, using the blue round loom and e-wrap stitches to make an orange tube. I wove yarn back through the stitches to create a drawstring, stuffed it with batting and cinched it just enough to create the "sections" that occur on the pumpkin surface. What do you think?


A Nice Surprise Gift!

You may recall a couple of weeks ago I attended the North Jersey Fiber Arts Festival. Well, at the festival my daughter tried her hand at weaving at a loom. The nice lady who was helping children learn to weave told us that she would finish the weaving that my daughter started and send the completed piece to us in the mail. I thought that was a really nice gesture and looked forward to receiving it in the mail. Several days ago, my daughter and I went by the Post Office box and to my surprise there was an envelope. I told my daughter that she had gotten some mail, and her eyes lit up as a smile brightened her face. She was delighted when opened the envelope and she saw this:


I reminded her about how we had attended the festival and how she had started making this bookmark there. I read to her the enclosed note: "Greg, it was great to work with your daughter. I hope that she continues her interest in the fiber arts - Carol (from the Palisades Guild of Spinners and Weavers (www.mafafiber.org/palisades)" Well, she is certainly off to a good start! Thanks Carol!

Thursday, October 21, 2010

Another Coffee Can Doll Coming Soon!

I'm almost finished working on my next coffee can creation, and she's a real darling! A few finishing touches and she'll be ready for her close-up probably late next week, if I can get my props for the photo shoot ready. Regardless, I'll keep you posted.

I'm also working on another fall project: pumpkins! Now, I've seen loom knit pumpkins online already, but mine is going to be made differently. I'm testing two designs right now and will post both of them when they are done.

Thursday, October 14, 2010

Fall Project Number One - Loom Knit Corn!

I started my fall projects late this year, but one of them took a little longer than I expected. I thought it might be nice to loom knit some corn to hang on the door for a fall decoration! It was very simple to do, so I tried making it 3 different ways, using the Knifty Knitter flower loom. The first time, I used some yellow-gold yarn that I had leftover from last Christmas. Since it is such a thin gauge, you can see the batting through the stitches, even though I used 1 over 2 stitches.
Simply e-wrap your loom and knit away to the desired length; mine is 8 inches long. After binding off with the yarn needle, I sewed the bottom end of the corn shut and stuffed it with batting. It is probably best to use one long piece of batting rather than stuffing it with several pieces, since it will not come out even. I stuffed mine with smaller individual pieces and even though I tried to shape it, it still came out a little lumpy. You will want to slightly overstuff it so the corn "leaves" will have a secure footing. For the top of your corn you will need raffia. I cut mine a little too short for the first corn. All you do is - after you cut the raffia, set aside one strand of it. Fold the raffia in half and tie it with the strand, around the folded end. Insert the folded end of the raffia into the top of your corn. Thread your yarn needle with the tail from the top of the corn and pull it to cinch the yarn around the raffia. Then you will go through the raffia with the yarn needle and sew the yarn onto the other side of the top of the corn. Do this a few times, crisscrossing the yarn through the raffia, pulling it tightly so that it will be secure, taking care that you are sewing it on straight. Take another strand of raffia (#2) and tie it around the outside of the corn leaves, about 1.5 inches up from the top of the corn. Then take another strand of raffia and sew it around strand #2 through the raffia, otherwise it will slide down. And you're done! You can either braid some raffia and loop it to strand #2 to make a hook for your corn to hang from, or just use some yarn the same way.
For corn number 2, I decided to use "I Love This Yarn! Candycorn Ombre yarn that I bought from Hobby Lobby. I followed the same directions above and here's how it came out:
I liked it, and it felt and looked more like corn, but I still wasn't completely satisfied. I didn't like how the colors of the yarn made a distinct pattern on the corn; I wanted the pattern to be more random like real corn would be. So I tried again.
For corn # 3 I decided to make the whole thing using what is known as a popcorn stitch. To cast on I used a one over one stitch. Then for every peg I used the popcorn stitch: I wrapped peg 1 once and knit off, then I wrapped peg 1 again and knit off until I had wrapped and knit off peg 1 4 times. Then, using the hook tool, I pulled the loop from first stitch that I knit off and put it back onto peg 1. Then I knit off and moved to peg 2 and repeated the process until I completed 1 row. Then I simply e-wrapped all the pegs once and knit off. For the next row I used the popcorn stitch. I alternated between popcorn stitch rows and plain e-wrapped rows until I reached the desired length and followed the same directions for adding the batting and raffia as for corn #1, except I cut the raffia much longer. I finally achieved the look I was trying to get! Naturally, corn #3 takes the longest to make, but I am satisfied with the results. The candycorn yarn pattern isn't as noticeable, and the texture of the finished product feels a lot more like corn. Had I not stuffed the corn as much, The stitches would have been tighter together and perhaps looked even more realistic. What do you think?

Tuesday, October 5, 2010

North Jersey Fiber Arts Festival

My daughter and I went to the North Jersey Fiber Arts Festival this past weekend (http://www.northjerseyfiberartsfestival.com/). It was nice weather on Saturday, and the drive to the festival was fine until we got closer to it where the traffic was really snarled. But on this particular road in NJ traffic is always pretty ugly.
Anyway, once we arrived at the festival, all traffic cares melted away as the feeling of being among friends welcomed us. The admission fee was $8.00/person, which was certainly a bargain for the fun that was to be had. The festival was inside a center which had two rooms, one large and one small.
In both rooms there were interesting demonstrations going on,
weaving at looms large and small (even my daughter tried her hand at the small loom - no that isn't her or me in the picture!)
felting
and vendors with plenty of wonderful items to choose from.
Duduza Dolls, dolls knitted and distributed to Ghanaian children recovering from surgery
There were also workshops going on, but I knew ahead of time that we weren't going to be participating in any of them. Our friends from Abenaki Acres Alpaca Farm (http://www.abenakiacres.com/) were also there, whom we gladly greeted and chatted with for awhile. Outside there was a large tent where you could sit and knit quietly, or eat lunch at tables provided. My daughter and I shared a turkey and swiss sandwich. I'm very glad that we went!
Probably the funniest moment of the day came when I saw this bumper sticker sitting on a vendor's table:

It just cracked me up, since I knew exactly what it meant! Knit 1 Pearl 2! Pretty much summed up the experience for me!

My frog got frogged!

The Pastor at my church started a new series of sermons he entitled "The F.R.O.G. in the swamp," and he asked congregants to bring in a frog to put on the altar. The acronym F.R.O.G. stands for "Fully Rely On God." The object of the sermon series is to point out how God is fully reliable and trustworthy no matter what is going on in the "swamp" of our lives, and regardless of what lies the enemy tries to get us to believe about ourselves.

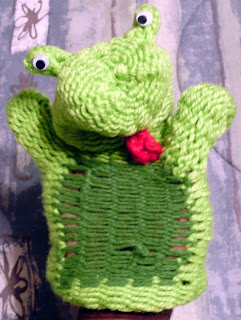
Naturally my first thought was to loom knit a frog to put on the altar. But I couldn't think of how I wanted it to look. I surfed the web to look at several designs, but none of them really clicked with me. I finally decided to make up my own pattern, and make my frog a children's puppet. Using some of the yarn that I received free using Freecycle, here's the first frog I created:


I liked how it came out, but it didn't seem very frog-like to me. His head was too narrow, and the stitches made him look as though he were an alligator. So I frogged my frog down to the neck and made a new, wider head for him. I also turned him inside out, so the stitches wouldn't interfere with the design. Here's how frog #2 came out:


I like this one much better, don't you? Though he does look a little cheeky, with his tongue sticking out. Either that, or there's a fly buzzing around your head that he's about to zap...

Overall he was pretty simple to make. I used the pink straight loom both times, knitting 1 over 2. I made frog number 1 all in one piece. The eyes and tongue I made separately and attached.

Now when I go to church I will put him on the altar. When I do, I'll take a picture of him sitting with the other frogs and post it here. The sermon series isn't over yet, but when it is I'll post a link to it here.

Tuesday, September 28, 2010

National Alpaca Farm Days!

This past weekend was the annual celebration of National Alpaca Farm Days (Sept 25-26) http://www.nationalalpacafarmdays.com/ . Though the weather was overcast on Sunday, after church we decided to visit Abenaki Acres Farm in Stockton NJ (http://www.abenakiacres.com/ ). So glad we did!
This clean and spacious alpaca farm offered an inviting open house tour, where you could get up close and personal with their herd of alpacas.
Our daughter was comfortable enough with the alpacas to have them eat out of her hand (a trick she taught me to do years ago!)
Gracious hosts Bill & Elizabeth Johnson were on hand to answer any and every question you could possibly think of about alpacas, and their staff was remarkably kind and helpful too! Naturally I was drawn to the fiber art offerings (an assortment of clothing, finger puppets, alpaca yarn, etc.),
My wife found an awesome poncho that looks like it was made for her, for a great price! And there were some people there demonstrating felting techniques, as well as spinning.
One of these days I will get a wheel and learn how to spin also. Our daughter seems pretty interested in the wheel every time we see one at various fiber events we go to, so it might be a good craft for her to learn as well. When I get one, I want the large old fashioned solid wood kind, though I'm sure I need to experiment with several kinds to see which one I might actually like best.
It was obvious that our hosts and their staff loved the alpacas and loved caring for them. Though it rained off and on during our visit, it didn't dampen our spirits and we had a really nice time.
Did you attend any alpaca farms this past weekend?

Wednesday, September 22, 2010

Fruit, Dolls & Toys Galore!

On Saturday, we went on a family outing to enjoy Apple Day at Terhune Orchards in Princeton, NJ (http://www.terhuneorchards.com/). It was a lot of fun walking around the farm,


taking the wagon ride through the fields,
watching our daughter ride a pony, getting lost in the corn maze, and of course, picking apples.


As we were driving back home, I noticed a sign that read "Doll Museum." I said to my wife, "You wanna go?" She said, "Sure!" So we visited the Princeton Doll & Toy Museum in Hopewell, NJ (http://www.princetondollandtoy.org/).


It was truly an unexpected delight, with dolls and toys everywhere you could look!


Some exquisitely rare,


a Shirley Temple section (with a delightful video of her singing songs from her movies),


a doll research library, miniature rooms, and a thoroughly knowledgeable museum director and gracious host, Ms. Virginia Aris. Though it was a relatively small space, there was so much to look at! Much of the museum was a "do not touch" zone, but one of the best features was a play area for small children (like our daughter) full of small toys that were "ok to touch and play with." I really appreciated that! It was only $5 per adult to get in ($3 per child), and well worth the admission. Plus there are 2 separate display houses with even more dolls and toys on display, one house entitled "Alice in Wonderland House," which of course I took special interest in (considering my own doll).


If you are ever in the area, be sure to stop in and visit Terhune Orchards and the museum; they are close to each other!