Showing posts with label Christmas. Show all posts

Monday, February 20, 2012

Christmas & Winter Projects

As promised, here are my Christmas and winter projects:
I received a couple of orders for gifts - a hat and scarf set (using Lion Brand Homespun black), scarf knit on the pink Knifty Knitter loom and Hat on the round green KK loom


and a green and white scarf using Homespun Deco and Green Apple, knit on the pink KK loom:


I also made a scarf using Homespun Colonial as a Christmas gift for a dear friend's Mom, but I don't have a picture of the completed scarf. She was delighted to receive it.


Though the same dear friend of mine gave me a delightful Santa hat that was decorated with glittery poinsettias, and I wore it through the entire Christmas season, I had decided several months earlier that one of my projects was going to be a Santa hat. When I was at the yarn festival in Rheinbeck, NY, I had bought some deep red Cascade Yarns Magnum Peruvian Highland Wool for the purpose of making the Santa hat. It is like roving, with a gauge similar to Lion Brand's Thich & Quick. So just before Christmas I knit it (1 over 1 stitches):


Instead of using a series of decreasing stitches to make it, I simply used all of the KK round looms (including the flower loom). I started with the green roound loom and knit off several rows to make the bottom of the hat. Then I used the yarn needle to bind off with a separate piece of yarn instead of the tail from the working yarn. I then carefully put the loops from the yarn onto the next smaller size round loom, combining a few loops on one peg near the anchor peg to accomodate for the decrease in size. I continued this process until the hat was finished. You can see in the photo above where I combined loops when I switched looms. I used this as the back of the hat.


It makes for a continuous knitted look, as opposed to knitting the hat in sections and sewing the sections together. I'm sure there are different ways to make the hat, but I wanted to experiment with this way first. The yarn is so stiff, the hat can stand up on its own without much effort:


The brim and the pom pom are made of white eyelash yarn, and I used the Lion Brand pom pom maker to make the pom pom on top.


Two other projects I made for myself were a scarf that I knit up using 1.75 skeins of Lion Brand Homespun tulips yarn.


The flash on the camera made the yarn appear brighter than it is. As soon as I saw this yarn in the store, I knew I wanted to use it to create a scarf to wear with my brown coat. The yarn has just the right shade of brown mixed in with it to match the coat, and magenta is one of my favorite colors.

My last project for myself was a blue scarf using 3 skeins of Lion Brand Wool-Ease Thich & Quick Navy yarn. I had been wanting to knit a blue scarf to match the blue hat I had made last year, so I finally got around to it. I used the KK purple loom to knit it, since the pegs are spaced farther apart than the smaller looms, and I knew I wanted my scarf to be flexible, not stiff. The scarf is about 8 feet in length, and it is warm, cozy and fashionable.


Next time: my Valentine.

Wednesday, February 2, 2011

Two Loom Knit Purses!

Here are two sweet little purses that I knit for Christmas gifts in 2010! The first one I made for my Mom using the yellow straight loom on 34 pegs (counting the corner peg and using a loom clip).


I did a double strand 1 over 1 e-wrap stitch, using 2 skeins of Loops & Threads Impeccable Worsted yarn, Earth Ombre color. The bamboo handles I picked up from an online craft supply shop, the button and the inside fabric I bought from Walmart. The purse is 8” long and 6” wide. It doesn’t have a large opening for the purse because the handles take up so much room, but it was my first time making one so it was a learning experience. For the inside lining I just sewed together two pieces of fabric that I cut out, and then sewed the bottom edge of the lining to the inside bottom edge of the knitted purse. Then I sewed the top lining along the edge of the top.


The button holder is simply an i-cord.


This purse I made for my wife:


Front:


Back:


I made it the same way but I used alpaca yarn (1 gauge) and Ella Rae Amity yarn color 3 (which I think is cocoa), using the two strands together to knit 1 over 1. I chose these colors to match an alpaca poncho that she has. I made her purse the same way as my Mom’s, but for the flap on top I simply bind off one side of the loom, then knit on the flap on the other side of the loom and bind off. Once again I made an i-cord for the button loop. I got the handles from the same online craft supply store, but they are a different style.


I made one more purse as a surprise gift for Christmas for someone which I will post next week, and I am working on another one as a gift for someone next month. Everyone was delighted with their gifts!

Monday, December 27, 2010

Merry Christmas Tree!

I was having trouble posting this over the last few days, but I was finally able to get it posted.
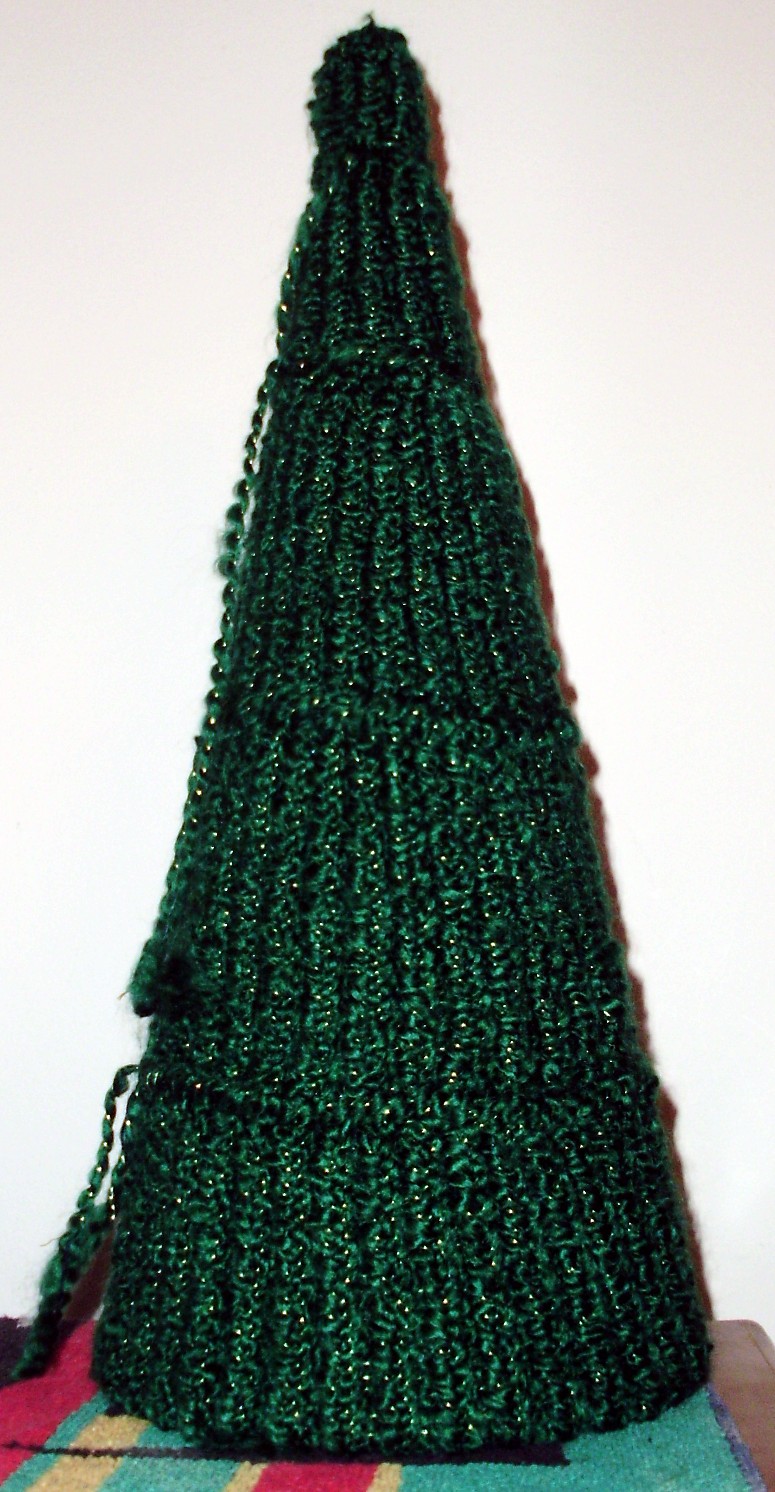
My final Christmas project for this year was a Christmas tree I designed myself! This adorable tree decorated with poinsettias and lights stands 27.5 inches tall and was a delight to make!


First I started by deciding on how I wanted the poinsettias to look. I created them all in one piece, using the flower loom and Homespun candy apple red yarn. But they came out looking more like a star (the one on the left), and they weren't the right color. I tried again, increasing the number of leaves and using red heart red yarn. Now it looked more like a poinsettia to me (the one on the right):


I knit 20 poinsettias and set them aside.
To knit the tree, I used Homespun Evergreen Christmas yarn and every round loom I had. I knit each section of the tree from small to large, and then sewed them together with yarn. I knit the bottom section of the tree a little longer than the cone so I could pull the tree taut against the cone and cinch it underneath.


After I completed it I thought of a different way of creating the tree in one piece; maybe next year I'll try it out and see if it works.

To assemble the tree, I purchased a clear plastic cone from an online craft store to use as the inside of the tree, because I knew styrofoam wouldn't work well with the lights. Plus I didn't want the color of the styrofoam to show through the knitting. I bought a wood dowel and painted the bottom part of it brown, to use as the tree trunk. I bought a strand of 20 red Christmas lights. Then I bought some styrofoam discs that I would cut to insert and glue inside the bottom of the tree and into the base of the pot, to hold the tree steady and upright.

Before I put the lights in, I sewed the poinsettias onto the tree. This could have been a big mistake, since I didn't take into account the distance between each light bulb -vs- the distance I had sewn on each poinsettia. But fortunately all of the lights were able to reach the centers of eack poinsettia as I had planned.
Another problem with sewing the poinsettias on the tree first happened when I had to space and match each light with the center of each poinsettia I had sewn on. I had to use an exacto knife to mark the center of each poinsettia on the plastic cone. Then I enlarged the hole in the plastic cone and pushed each light through. Then I secured the lights using black electrical tape, which I knew would be covered up by the poinsettia.
Next I carefully turned the tree inside out, and pushed the lights through the center of each poinsettia, starting at the top. This was difficult, but not impossible. I poked a pencil through the center of each poinsettia to guide my finger and to make the hole big enough for the light to push through. The ones at the top were the hardest, but after the first few I was able to position the lights both inside and outside the cone through the yarn.

At first I had planned to knit the star on top of the tree. I was going to make a large poinsettia for the top, but I just wasn't getting a good design together for how I wanted it to look. So I found a star at the craft store to use instead.
The last part I bought was the pot itself: a cute wicker basket that I found at the craft store, in the shape of a snowman's hat. It was just the right finishing touch!
Here is what the tree looks like with the lights on,
and an artistic rendering of it:


Hope you and your family had a wonderful Christmas!

Friday, November 12, 2010

No more pumpkins for now

I thought I was going to create another pumpkin pattern, but I was so happy with the way the first one came out I didn't try to make any more!

I started working on a few Christmas crafts and I look forward to posting the new projects over the next few weeks.

In the meantime I made a hat for a friend of mine based on the pattern for the Popcorn Bobble Hat from page 14 of the book, "Learn New Stitches on Circle Looms" by Anne Bipes. Instead of the white hat pictured in the book, she wanted black. Here's how it came out:

It's a little harder to see the popcorn bobble pattern in black in a photograph without making the photo so light that it washes everything out. My friend loved it very much.

Wednesday, January 6, 2010

Mini Christmas stockings

Last but not least, I made some mini Christmas stockings from the red and white yarn I had left.


I made them as giveaways, and to help me practice making the heel part of the stockings. They were fun and easy to make, and barely took an hour each (if that). They measure about 6" in height, but I forgot to measure them so it's just an educated guess.

A new scarf for my sweetie

I made another scarf for my wife this year for Christmas. This time I chose Lion Brand Hometown USA Cleveland Brown and Los Angeles Tan Super Bulky yarn. It took me about 8 hours to make the scarf, partly because I used 3 different kinds of stitches to make it. I used a regular stitch for the white part, then for the brown I used a ribbed stitch.

But once I got to the center of the scarf, I used an alternated ribbed stitch, just to add interest. It's hard to see it in the picture.


She loved it!

Christmas bulb ornaments!

For years I have had some clear glass bulb ornaments lying around, buried in a box, in hopes that one year I would get creative and make something out of them. Well I finally did it. I used the Knifty Knitter spool loom to create some wreaths, decorated them, and carefully inserted them inside the bulbs! For each one, I used Lion Brand Holiday Homespun green and red, and some wire ribbon I had at home.

For the first one, I inserted the wreath inside the bulb and then knit the ends together once it was inside.


But this was a little bit too tricky to repeat over and over, so for the next ones I just knit them together first, decorated them, and then inserted them inside the bulbs. I don't have a picture of the very first one because these bulbs are hard to photograph, and the picture I took really didn't come out that well.

This one has a small rose on it that I had lying around from some Valentine's project. I didn't make it.


Some of my coworkers saw me knitting and creating these bulbs, and even though they saw how I got them in there, they still marveled at them when they were completed. The people who received them as gifts were amazed and excited by them as well.

But below is my favorite one: the Christmas tree!


I made a poinsettia a while back, so I just used the same technique that I had learned to make the poinsettia leaves to make the Christmas tree. I already had some miniature Christmas presents among the Christmas decorations at home, so I just used them and glued them and the tree inside the bulb. The tree only took about an hour to make, including decorating both sides. I tied the red ribbons myself! No small feat. But voila! What results! I would still have it if someone hadn’t bought it! Not that I’m mad about THAT! And they loved it. The person's wife said it was too good to hang on the tree, that it was heirloom quality. What a compliment!

You're an angel!

Here's my little angel that I made based on the pattern I got from loomlady.blogspot.com (her 11/6/09 post)


Here's the back of it:


It didn't take long to make at all! Just about 2-3 hours (once you make an assemble all the parts). I take my time knitting anyway. I used Bernat Baby Coordinates Natural White for the yarn. I didn't have any gold rings for the halo, so I just used a sparkly gold pipe cleaner instead. I think that sets it off nicely.
For the arms: I didn't like the way it looked with just one I-cord for the arms. To me it was just too thin-looking. So I sewed the one I-cord together side by side to make one arm, and did the same for the second arm. This made the arms more like arms in clothing to me.

Then once I assembled it with the wings, I felt it just needed a little SOMETHING. So I made a rose using lion brand homespun holly red. I knitted an I cord and curled it around until it looked rose-like to me, and then carefully sewed it together in that position. For the stem I simply took lion brang homespun holiday green and made a tight braid out of three strands of it. It came out nice, don't you think?

What's even nicer is that someone bought it, and asked me to make another one just like it! Here it is below:
As you can see I used a different green yarn for the stem on this rose, because I ran out of the holiday green that I had used for the first one.