Thursday, March 7, 2013

Introducing Suzie Snowflake, Queen of Winter

It has been awhile since I created a new coffee can doll (which is a doll that is covering a coffee can), so I figured I’d try my hand at something special for winter. Last year during the holiday season I was watching tv with my daughter and a black and white short reel from the 1950s came on called, Suzie Snowflake. I thought my daughter might be entertained by it, so we watched it. But instead of amusing her, it actually frightened her a bit, so I turned it off. I guess it was a bit much to think that every time it snowed, there was some little person flying around who would come tapping at your window. But it made me think about making a coffee can doll out of the idea, and here she is!


When I took these pictures it was quite windy outside and late in the day, so it was difficult to keep her standing up and not have my shadow fall across her while I took the shot.
Everything has been knit on the various sizes of both the round and flower looms. Her outfit illustrates different kinds of snow at different stages. For example, the large shape of her crown illustrates the large, wet flakes that often fall during the winter.
I raided my stash and found a white yarn that had strands of glittery thread in it, so I used that for her snowflake shaped crown, her blouse, and the scalloped design at the bottom of her dress (which illustrates piles of snow that have been plowed).


 The petticoat under her dress is straight white yarn, which represents snow after it has been packed down and frozen. I used a baby blue baby yarn for the dress, which reminded me of the color of the winter sky. And to illustrate powdery snow spraying up at the bottom of a hill when you sled down it, I used eyelash yarn. The diagonal line of eyelash yarn going down the front of her dress represents the trail that the first sled left as it went down a hill of newly fallen snow. And there you have it! I am still compiling my instructions for knitting the coffee can dolls, and when everything is finished I will be publishing all of the directions in a book.


Sunday, October 28, 2012

Get Into The Spirit Of Things

Well, Halloween's almost here, and I haven't finished making my simple knitted Halloween costume for a child: a ghost ~


If you have two days to do nothing but knit on the loom, you can get yours done in time. Here are the directions:

On the Knifty Knitter blue loom, I added 1 peg to the corner and am currently knitting stockinette 1 over 2 stitches using Red Heart White yarn. My goal is to knit a piece that is 24 inches long and bind it off the loom. Then I will knit another piece identical to it and join the two pieces together, being careful to leave a hole for a child's head to go through - about 12 inches. Next, on 31 pegs (1 peg is a corner peg) I will knit off a 10" piece that will be used as the hood. I will bind it off and then attach the bottom corner of the hood to the neckline of the costume. After that I will block the entire piece and it will be ready for wearing. If oyu try it, let me know!

Tuesday, October 2, 2012

Tissue Roll Rattle Doll

this is not a rattle suitable for babies or young children.


Hello, one and all! I have been away for quite some time due to various reasons, but now I return with a new doll.

While I was not blogging, I was still working on creative projects, and this doll was one of them. It is a unisex doll, and anyone with intermediate beginner loom knitting skills can enjoy making it. I chose to make this a black doll, though it could be any color, based on whatever yarn you have on hand. The yarn I used is the Lion Brand Thick & Quick black. To make this doll I used the flower loom, spool loom and the blue round loom from the Knifty Knitter series. I also used a hand towel roll (the round cardboard tube that the hand towels are wrapped around) which I cut to 5”, and a piece of black construction paper.
The arms and legs are knit 1 over 2 stockinette stitches on the spool loom , with the 4” long arms knit on the 5 peg end and the 5” long legs knit on 5 pegs of the 8 peg end. After knitting them and setting them aside, I wrapped the paper towel roll with black construction paper and taped it to the roll. I then traced around the roll end twice onto a separate piece of black construction paper and cut out the circles. At one end of the towel roll I taped the construction paper circle over the hole. Then I poured a handful of pony beads into the roll and sealed the other end with the second circle of black construction paper. I knit the 6” long body using 1 over 2 stockinette stitches on all pegs of the flower loom, with a drawstring cast on and bind off. I then turned the finished body inside out and stretched it over the construction paper wrapped hand towel roll, cinching the body shut over each end.
The head is made 1 over 2 stock-inette stitches on the 8 peg end of the spool loom for 12 rows, with a draw-string cast on and bind off. I turned the head inside out, cinched one end shut and sewed on the lips with red yarn and the eyes with white and black yarn. The hair I sewed on using the black yarn. After sewing, the yarn can be gently combed with a large tooth comb if you prefer the doll to have curly hair instead of dreadlocks. After stuffing the head with batting and shaping it, I cinched the remaining end shut and sewed the head onto the doll. Next I sewed the arms on near the head. On the bottom of the roll I tucked the yarn tail into the inside of the body and sewed on the legs. I used whatever yarn I had leftover on hand from my stash to create the clothing on the blue round loom: a tunic for the man doll, and a long dress with a head wrap for the woman doll. For the necklace I strung tiny pony beads onto some thread and tied it around the doll’s neck. This helps to cover the area where the doll’s head is attached to the body. And you’re done! This doll was fun to make, and perhaps the most fun is shaking it to hear it rattle and watch the hair bounce around wildly!


For a sturdier construction of your doll, substitute a wooden dowel or piece of pvc pipe cut to the length and diameter of the tissue paper roll.

 
Thanks!

Saturday, March 3, 2012

Cowl & Mitten

Someone asked me to create a cowl for their daughter, and here it is!

It's based on the urban cowl pattern by the fabulous Isela Phelps, though her pattern calls for a series of knit and purl stitches. My stitches are all stockinette due to the usage of the colors and because of the deadline involved. Following Isela's directions, the cowl was easy to make on the yellow round Knifty Knitter loom.The challenging part was incorporating the white, black and grey stripes. This was done simply by cutting the yarn and tying the two color strands together every time I wanted to add a stripe.


The yarn I used was Michael's Loops & Threads Cozy Wool Black and White, and a grey roving which I don't recall the brand name for.It took me a white to pick out the colors even though they are simple ones, because I wanted them all to work together. If the white was too white or the grey too dark, it wouldn't work for me. The person who received it was delighted.

The cowl is versatile because you can wear it in several ways. Here are three ways -


One row around your neck with a large hanging loop,


two rows around your neck or


three rows around your neck. Since it is a wool blend it is not itchy.

Next, I knit a replacement mitten for someone, using Fisherman's Wool. You may recall last year that I knit the same person a pair of felted mittens. He has a large growth on his hands and so there were no mittens available in stores that were large enough for him. Unfortunately, the growth on his hands has continued to enlarge, so he required a larger replacement for the one I had made. Here's how it looked after I felted it:


I didn't allow it to shrink too much from the size I made it, but just enough for the fibers to entagle together and form a strong bond. As was expected, the thumb stretched out as it shrank and felted, which required me to cut it. So after I sewed on the fleece and elastic border to the bottom of the mitten, I turned the mitten inside out, cut the thumb and sewed it shut. Here it is inside out. You can see the inside is nice and smooth for his hand:

After sewing the thumb shut I turned the mitten outside in, and here's the finished product. He was very happy to get it.

Tuesday, February 21, 2012

Valentine's Day

I really hadn't planned on making anything for Valentine's Day this year, but I was inspired by a close friendship to create a heart as a gift:

I knit this on the straight pink Knifty Knitter loom, starting at the bottom of the heart. I knit each heart panel separately and then sewed them together and stuffed them with batting. If you would like to make your own heart, here are the directions:

On one side of the loom , wrap the two center pegs (pegs 6 & 7) with a 1 over 2 stitch and knit off 3 rows. Increase by wrapping pegs 5 through 8 and knitting off 8 rows. Increase by wrapping pegs 4 through 9 and knitting off 12 rows. Increase by wrapping pegs 3 through 10 and knitting off 10 rows. Increase by wrapping pegs 2 through 11 and knitting off 18 rows. Increase by wrapping pegs 1 through 12 and knitting off 14 rows.

Then on the end of the loom with the working yarn, wrap 6 consecutive pegs starting with the end peg to the center peg. * Knit off 3 rows. Lift yarn from peg 6 to peg 5 and knit off. Lift yarn from peg 1 to peg 2 and knit off. Then on pegs 2 through 5, knit off 3 rows and bind off, leaving a 4" tail.

Then on the opposite end of the loom that still has yarn wrapped around the pegs, wrap 6 consecutive pegs starting with the end peg to the center peg. Follow from * above. This completes one heart panel. Repeat entire process to create another heart panel, then sew one side of the heart together along the outer edge. Partially stuff with batting. Continue to sew around the edge of the heart, but before you finish sewing the heart together make sure you have stuffed the heart with the desired amount of batting.

For the doily fringe, I used the green loom. Cast on 1 over 2 on 48 pegs (including 1 corner peg).Knit off 5 rows. Then starting at the end where the working yarn is, knit off a 10 row I-cord and * transfer the loops one at a time from peg 1 onto peg 2 and knit off. Then trasfer the loops from peg 2 onto peg 3 and knit off. On pegs 3 and 4 knit off a 10 row I-cord and repeat the directions from *, taking care to wrap the pegs one after the other going in one direction until you are done. Sew the fringe onto the edge of the heart all the way around, and voila! Needless to say, the recipient of the heart I made was absolutely thrilled.

If you want a heart that isn't so narrow or large (this one is about 8" tall), simply use a different straight loom and adjust the number of stitches and the number of pegs that you knit off of. More pegs = wider heart.

Monday, February 20, 2012

Christmas & Winter Projects

As promised, here are my Christmas and winter projects:
I received a couple of orders for gifts - a hat and scarf set (using Lion Brand Homespun black), scarf knit on the pink Knifty Knitter loom and Hat on the round green KK loom


and a green and white scarf using Homespun Deco and Green Apple, knit on the pink KK loom:


I also made a scarf using Homespun Colonial as a Christmas gift for a dear friend's Mom, but I don't have a picture of the completed scarf. She was delighted to receive it.


Though the same dear friend of mine gave me a delightful Santa hat that was decorated with glittery poinsettias, and I wore it through the entire Christmas season, I had decided several months earlier that one of my projects was going to be a Santa hat. When I was at the yarn festival in Rheinbeck, NY, I had bought some deep red Cascade Yarns Magnum Peruvian Highland Wool for the purpose of making the Santa hat. It is like roving, with a gauge similar to Lion Brand's Thich & Quick. So just before Christmas I knit it (1 over 1 stitches):


Instead of using a series of decreasing stitches to make it, I simply used all of the KK round looms (including the flower loom). I started with the green roound loom and knit off several rows to make the bottom of the hat. Then I used the yarn needle to bind off with a separate piece of yarn instead of the tail from the working yarn. I then carefully put the loops from the yarn onto the next smaller size round loom, combining a few loops on one peg near the anchor peg to accomodate for the decrease in size. I continued this process until the hat was finished. You can see in the photo above where I combined loops when I switched looms. I used this as the back of the hat.


It makes for a continuous knitted look, as opposed to knitting the hat in sections and sewing the sections together. I'm sure there are different ways to make the hat, but I wanted to experiment with this way first. The yarn is so stiff, the hat can stand up on its own without much effort:


The brim and the pom pom are made of white eyelash yarn, and I used the Lion Brand pom pom maker to make the pom pom on top.


Two other projects I made for myself were a scarf that I knit up using 1.75 skeins of Lion Brand Homespun tulips yarn.


The flash on the camera made the yarn appear brighter than it is. As soon as I saw this yarn in the store, I knew I wanted to use it to create a scarf to wear with my brown coat. The yarn has just the right shade of brown mixed in with it to match the coat, and magenta is one of my favorite colors.

My last project for myself was a blue scarf using 3 skeins of Lion Brand Wool-Ease Thich & Quick Navy yarn. I had been wanting to knit a blue scarf to match the blue hat I had made last year, so I finally got around to it. I used the KK purple loom to knit it, since the pegs are spaced farther apart than the smaller looms, and I knew I wanted my scarf to be flexible, not stiff. The scarf is about 8 feet in length, and it is warm, cozy and fashionable.


Next time: my Valentine.

Monday, January 2, 2012

HAPPY NEW YEAR ALL


Hello everyone, after a long hiatus due to router, computer and digital camera issues, I'm back, and I haven't been slacking off in the knitting department while I was off line! I will be catching up the next two posts on what I've been doing all this time, and then I'll discuss what I'm working on now.


First, you may recall that I had been working on a skeleton costume. Well, it turned out that I was unable to get enough yarn to complete the project, so I finished making the shirt:

I had started out using Bernat Glow in the Dark yarn, but wound up finishing with Nightlights Glow in the Dark Yarn, which has a slightly lighter gauge. For whatever reason glow in the dark yarn must have been big last Fall, because I could not get more than a few skeins of it, and small skeins at that. I did the best I could with what I had. You will notice that on one sleeve, the arm bone is one long continuous bone; I wanted to see what it would look like if I just knit one long bone instead of separating them like on the other sleeve. As far as the digital camera is concerned, I no longer had access to the one which had a candlelight setting on it as freely as I had in the past, so I bought a cheap replacement camera that I thought would do the same thing. I should have known better, and I wasn't able to invest in another camera right away. Once I was able to get access to the camera with the candlelight setting again, I took this picture:


And here it is using some enhanced settings in the photo retouch program I use:


My November project was a time consuming one indeed, but one I take great joy in seeing the finished product: a cornucopia!


Yes, it's true, knitted cornucopias have been done before, but I've never seen one using raffia on the loom! I bought a couple of packages of raffia to work with, and found that it wrapped the pegs on the loom quite well. As long as I didn't wrap it too tightly, the raffia was flexible enough to work with without breaking. I simply knotted the strands together and knit with them, making for a more rustic and rough look:

Side and top view:


I used all of the round looms in the Knifty Knitter set, knitting a little on each one at a time and then joining the pieces together. To create the curl at the back of the horn, I turned one of the sections I was working on as if I was knitting a sock. Then I sewed two sections near the top of the cornucopia together. It really wasn't too hard to make, but you will want to use it in a well ventilated area. Raffia has a scent that some people may not like as they work with it. It didn't bother me though.


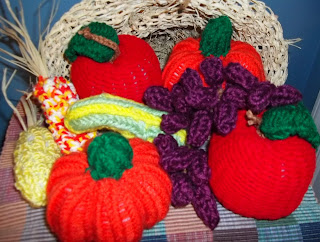
Then I knit the harvest bounty:


You may recall that I posted about making apples and pumpkins before on the loom, and I used the same techniques to make them. Simple on the round loom for the body, stuffed with batting, and I made the leaves for the apples on the straight loom, and the stems for the pumpkins on the spool loom, and sewed them on. The apple stems are just braided bits of brown yarn.


For the gourd I tried a new technique. I knew I wanted to use the flower loom to make the large end of the gourd, and I knew I wanted to use yellow and green yarn to make it. For the skinny "neck" of the gourd, I knew I wanted to use the large end of the spool loom. But instead of making the two pieces separately and joining them, I used a threaded yarn needle to remove the bottom end of the gourd from the flower loom and simply knit off the extra loops on pegs with the same colors as I placed the loops onto the spool loom. The flower loom and the spool loom don't have the same number of pegs, so it was necessary to decrease in this way for this technique. It made for a more unified look, and I used the same technique for a Christmas project I will discuss in the next post.


The corn I have made before using the round loom. This time I used the spool loom to make two small ones, stuffed them with batting and attached raffia to the top for the husk.


For the grapes, I cast on the 5 peg end of the spool loom and knit off 1 over 1 e wap stitches for 3 rows and then bind off. I made 20 grapes this way. The stem is simply bits of braided brown yarn.

I carefully knotted the tail from one end of the grape to the stems, and voila! The leaf was simple to make using the straight loom.


And there you have it!


Next time: Holiday projects!