Showing posts with label Coffee Can projects. Show all posts

Thursday, July 28, 2011

If Not Kansas, Then It Must Be OZ!!!

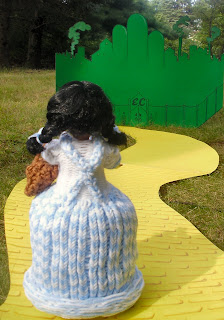
She's my latest Coffee Can Doll! Here are Dorothy and Toto, about to enter the Emerald City with their friends!!

No, I didn't knit or create the Cowardly Lion, Tin Woodsman, or Scarecrow in the background. But I did knit Dorothy's dress:

Since the details on how to create her will be in my upcoming book about all my coffee can dolls, I will only give a few details here. I call them coffee can dolls because under each doll's dress is a coffee can. I used the Knifty Knitter round looms to create the dress, painstakingly alternating the Red Heart Super Saver Spa Blue and White yarns to create the gingham-inspired pattern. I decided not to include the ruby slippers for her feet, partly because she doesn't have any feet! But also because I didn't think they would look right poking out from under the front of the dress. And in the original story the slippers aren't red; they're silver. I wanted her to be a combination of the "Dorothys" we have come to know and love on the silver screen, not just focusing on a particular one or accurately following her description in Frank Baum's book.

I used some brown yarn from my stash on the spool loom to create Toto's basket, seen here from various angles:


It took me awhile to find a dog that would be recognizable as Toto. I went to crafts stores, searched online, even considered sculpting my own Toto out of clay and painting him. I would find dogs that looked like him, but they were the wrong size. Finally, we were perusing a local Christmas ornament store that had just opened, and I found him nestled inside a Christmas stocking. He was just the right size, the right look, and everything! So I bought him, removed him from the stocking and twisted off the hook from his head. With a marker I carefully painted over the hole to match the color of his fur.

For my Emerald City, I paid homage to the movie and added a little of my own ideas about the city:

And yes, me being the detail-oriented person that I am, I individually drew and shaded every brick on the yellow brick road, even though I knew much of my hard work wouldn't be visible in the photos I took. I made them all different sizes, and drew them in perspective so that the further away they were, the smaller they were. Here's a close-up look:

It was a happy accident when I took the outdoor photos that the sun was shining in the direction that I had shaded the bricks.

So long, Dorothy! May you ever be enchanted by the spirit of whimsy as you follow the yellow brick road to your dreams!




Thursday, October 21, 2010

Another Coffee Can Doll Coming Soon!

I'm almost finished working on my next coffee can creation, and she's a real darling! A few finishing touches and she'll be ready for her close-up probably late next week, if I can get my props for the photo shoot ready. Regardless, I'll keep you posted.

I'm also working on another fall project: pumpkins! Now, I've seen loom knit pumpkins online already, but mine is going to be made differently. I'm testing two designs right now and will post both of them when they are done.

Wednesday, September 15, 2010

Curiouser & Curiouser! Alice is Here!

Here’s my little Alice! She finds herself in wonderland...
Poor dear, she seems to have drunk from the bottle marked, “Drink Me,”

and it has caused her to shrink down to a tiny size!

How curious!


No, I didn’t employ any tricks in photographing her, she really is that size!


She’s tiny, but she looks ever so sweet in her blue dress and apron!


Here’s my original drawing of her:


Early progress:


For her dress I alternated knit and purl stitches.


Her apron is all loom knitted in one piece.


When it came to her headband, she isn’t wearing one in Alice’s Adventures in Wonderland. She is wearing a ribbon in her hair in Through the Looking Glass. But instead of a ribbon I decided to braid a headband for her instead. At first I thought a dark blue yarn might work, as I’ve seen her with a dark headband many times before. But something about it didn’t look quite right to me.


Next I tried weaving a string of pearls into the braiding and changing her name to Elegant Alice. But that didn’t exactly suit her either.


Finally I decided I would braid together two strands of white and one strand of blue yarn, the same as I had used for her outfit. This looked best, so I braided two and then sewed them together with a little white thread.


To me, John Tenniel’s illustrations for Alice will always be the definitive image I have of her, since that is the version I grew up reading and loving. However, did you know that you can see what Lewis Carroll’s original illustrations for Alice looked like? Take a look! Go to http://www.bl.uk/onlinegallery/ttp/ttpbooks.html and scroll down, click on “The Original Alice” at the bottom center of the page. Be sure to leaf through the entire book, which is written in his own handwriting; at the end there is a photo of a little girl, presumably the real Alice Liddell. If you plan to do research on Alice Liddell, you will find that Lewis Carroll is a pseudonym for the author’s real name, Charles Dodgson. Just a little Alice trivia I thought you might enjoy!

Saturday, August 21, 2010

New doll started!

I started my next coffee can doll! I won't tell you who it is this time until I'm almost ready to post pictures. But suffice it to say she is truly scrumptious! I really only have 2 more pieces to knit to complete it, aside from sewing the pieces together. I'm excited!

Thursday, July 29, 2010

Little Bo Peep's Sheep

Well, I'm just going to give her a lamb, not all of her sheep; after all, she's looking for the other ones...


So far I just finished the head and one leg (apart from the body which I posted earlier).


I was going to sew the head onto the body but thought better of it, since I would need to attach the legs first. I plan to finish the legs by the weekend and put them on at the start of next week, if not sooner. I will make the staff over the weekend. I plan on making a few of them, in case one cracks when I bake them in the oven. I wonder what they will smell like when they're baking.

Tuesday, June 29, 2010

Baby Doll Stages

Here's the baby doll in progress:
First I removed the arms from the body and used the spool loom to create the sleeves. I did a drawstring cast on so I could tighten one end of the sleeve so it would flare out like a bell shape. I used a simple 1 over 2 e-wrap stitch. I made the sleeve in two segments and then sewed them together.
Next I made the upper part of the dress using the flower loom. It was a little tight near the waistline (dare I say such a thing), but I knew that part would be covered up with the hoop part of the dress. I attached an I-cord to the front of the dress to add interest. I had to remove the head in order to fit the dress on.
I created the outer part of the dress using the flap technique that I used to create the wings on the hens I made at Easter time. The bottom part of the dress naturally curled up once I took it off the loom. I used the round red loom to create the dress.
More details to come...

Thursday, June 17, 2010

For Dad... or not

Here are my Father's Day projects! The first one is a bank I made from a coffee can:


I used the red round loom to make the sleeve and drew up a diagram of where I thought the word "Dad" should be on the can. It looks fine when the yarn isn't stretched onto the can, but once I put it on the can the word "Dad" became difficult to read. Perhaps if I used a different kind of yarn? I used Homespun, which doesn't stretch a whole lot. I didn't try the next larger size loom because I thought it might be too loose on the can, but perhaps next time...

Here is a movie I filmed using my cell phone so you can see the word "Dad:"


Next up: another coffee can sleeve, but this time I wanted to create a dollar sign. I used Vanna White navy blue and Red Heart Paddy Green & Soft White. I didn't stretch it onto the can to see how it would fit yet, but when I do I will post the picture. I thought the dollar sign came out pretty good, except I was a little off at the bottom of the dollar sign.


Finally, I thought making a car air freshener using the flower loom might be an interesting project, so I used Vanna White navy and grey this time. The word "Dad" is easier to read (in my opinion), but it would look a little better if the letters were either smaller or more spaced out. My plan is to stuff it with batting, spray it with a little bit of cologne or fill it with some potpourri, and hang it in the car. I want to see how long it will take before the sun bleaches the color out of the yarn.


As far as what I gave my Dad for Father's Day: you'll just have to come back after Sunday to find that out. He'll have the gift by then.