Monday, January 2, 2012

HAPPY NEW YEAR ALL


Hello everyone, after a long hiatus due to router, computer and digital camera issues, I'm back, and I haven't been slacking off in the knitting department while I was off line! I will be catching up the next two posts on what I've been doing all this time, and then I'll discuss what I'm working on now.


First, you may recall that I had been working on a skeleton costume. Well, it turned out that I was unable to get enough yarn to complete the project, so I finished making the shirt:

I had started out using Bernat Glow in the Dark yarn, but wound up finishing with Nightlights Glow in the Dark Yarn, which has a slightly lighter gauge. For whatever reason glow in the dark yarn must have been big last Fall, because I could not get more than a few skeins of it, and small skeins at that. I did the best I could with what I had. You will notice that on one sleeve, the arm bone is one long continuous bone; I wanted to see what it would look like if I just knit one long bone instead of separating them like on the other sleeve. As far as the digital camera is concerned, I no longer had access to the one which had a candlelight setting on it as freely as I had in the past, so I bought a cheap replacement camera that I thought would do the same thing. I should have known better, and I wasn't able to invest in another camera right away. Once I was able to get access to the camera with the candlelight setting again, I took this picture:


And here it is using some enhanced settings in the photo retouch program I use:


My November project was a time consuming one indeed, but one I take great joy in seeing the finished product: a cornucopia!


Yes, it's true, knitted cornucopias have been done before, but I've never seen one using raffia on the loom! I bought a couple of packages of raffia to work with, and found that it wrapped the pegs on the loom quite well. As long as I didn't wrap it too tightly, the raffia was flexible enough to work with without breaking. I simply knotted the strands together and knit with them, making for a more rustic and rough look:

Side and top view:


I used all of the round looms in the Knifty Knitter set, knitting a little on each one at a time and then joining the pieces together. To create the curl at the back of the horn, I turned one of the sections I was working on as if I was knitting a sock. Then I sewed two sections near the top of the cornucopia together. It really wasn't too hard to make, but you will want to use it in a well ventilated area. Raffia has a scent that some people may not like as they work with it. It didn't bother me though.


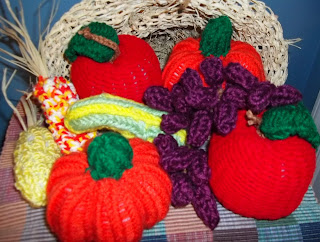
Then I knit the harvest bounty:


You may recall that I posted about making apples and pumpkins before on the loom, and I used the same techniques to make them. Simple on the round loom for the body, stuffed with batting, and I made the leaves for the apples on the straight loom, and the stems for the pumpkins on the spool loom, and sewed them on. The apple stems are just braided bits of brown yarn.


For the gourd I tried a new technique. I knew I wanted to use the flower loom to make the large end of the gourd, and I knew I wanted to use yellow and green yarn to make it. For the skinny "neck" of the gourd, I knew I wanted to use the large end of the spool loom. But instead of making the two pieces separately and joining them, I used a threaded yarn needle to remove the bottom end of the gourd from the flower loom and simply knit off the extra loops on pegs with the same colors as I placed the loops onto the spool loom. The flower loom and the spool loom don't have the same number of pegs, so it was necessary to decrease in this way for this technique. It made for a more unified look, and I used the same technique for a Christmas project I will discuss in the next post.


The corn I have made before using the round loom. This time I used the spool loom to make two small ones, stuffed them with batting and attached raffia to the top for the husk.


For the grapes, I cast on the 5 peg end of the spool loom and knit off 1 over 1 e wap stitches for 3 rows and then bind off. I made 20 grapes this way. The stem is simply bits of braided brown yarn.

I carefully knotted the tail from one end of the grape to the stems, and voila! The leaf was simple to make using the straight loom.


And there you have it!


Next time: Holiday projects!

Thursday, October 20, 2011

Loom Dude's Rhine (beck) Journey

This week, instead of an update on the skeleton, I bring you my story about the NYS Sheep & Wool Festival. I was fortunate enough to attend this event last weekend, and the weather held up the entire time I was there. But I did pass through a few brief showers before reaching the festival.

I knew it was going to be a great day when I woke up just in time to see this glorious sunrise:


After that I got ready to leave for what would be an all day trip from where I live. I was making a stop in Cornwall to meet a friend and then it was on to the festival from there. I didn't realize it, but my journey would also be taking me down memory lane. It brought to mind all those annual fall foliage trips our family used to take when I was growing up. Every year we would drive on Saturday in October to Upstate NY to admire all the fall colors and stop at whatever interested us as we drove to Hepworth Farms on Route 9W. To my surprise, I would be taking the exact same route past the farm to get to Rhinebeck. I was delighted! As I got closer, I began to remember all the places we stopped, all the landmarks I had memorized, and how much they had changed or stayed the sames in the years since I had last seen them. One place we often stopped was at a scenic overlook on the side of a mountain on 9W:

My route took me right past Hepworth Farms, but alas it was no longer there. It was sad because I remember they had a nice farm stand with all kinds of fresh veggies and fruit, a huge barrel with fresh apple cider in it, fresh hot donuts, and pumpkins. Fortunately I have plenty of great memories and pictures to remind me of the special place that Hepworth Farms was.

Finally it was on to Rhinebeck. It was my first time at the Sheep and Wool Festival, and I was looking forward to it. I was not disappointed. There was so much to see and do and hear, not to mention eat!


The biggest spinning wheel I ever saw. It was taller than me:

I bought some yarn to work on a Christmas project, but I won't show you what I bought just yet. And at the end of the day, the sunset was just as wonderful as the sunrise had been:

Thursday, October 13, 2011

Skeleton Shirt Half Done

Here's my progress so far:

I plan to make one more row of ribs and then the clavicle. On the side anchor pegs I will begin making the holes for the sleeves. I hope to have it completed by the next post. The pants shouldn't take too long to complete. It has been fun making it, but especially seeing the "bones" as they are completed. It's coming out so well, it's scary! : ) Can't wait to see it with the lights out...

Thursday, October 6, 2011

There's a Skeleton In My Closet


Well, ok, it isn't really in my closet... it's on my loom! For Halloween I decided to create a skeleton costume, using the long straight blue loom on all pegs (including the corner pegs) and a giant ball of Loops & Threads Impeccable Big Worsted Black yarn, with Bernat Glow in the Dark yarn for the bones (to make it even more creepy when trick or treating). I'm winging it, based on what I already know about creating shirts on the loom. Here is the pattern I drew up:


Each week I will post a little more of the progress until the costume is done. So far I cast on with the Glow yarn 1 over 2 stockinette stitch and knit off 15 rows. I plan to sew in an elastic band later, so this will stop the stockinette curl. Some of you more accomplished loom knitters could probably add the elastic band while you put the loops of yarn from the cast on row back onto the loom to knit off a "brim" with the elastic band enclosed inside. Right now I want to get the costume finished so it can be ready in time. I'm making pants to go with it. I decided to make this costume large enough to fit over a pair of black pants and long sleeve black shirt for my 6 year old daughter. She wants to be a princess, but I figured she wouldn't mind modeling it once it's done.


The spine is 4 pegs wide, knit for 25 rows, and the bones go from 16 to 20 pegs wide for 7 rows, and I plan to make 3-4 rows of them, depending on how many I can fit on the size shirt I am making. It will probably wind up being just 3 bones, since I need to leave space at the top for the clavicle bone. Here's a close up of the ribs so far:


I got a new digital camera, and so far I am not thrilled with the pictures it takes, but it will have to suffice for now. I'm hoping that the glow effect will be visible with this new camera.

Tuesday, September 20, 2011

Holiday Knitting Orders

Did you know that Christmas is less than 100 days away? The holidays are just around the corner, and it’s not too early to start thinking about those special people on your gift list. I am accepting orders right now for loom knit items you can purchase. These items will be knit to order by yours truly, and you can receive them well in advance of the holidays. Why wait until the last minute? Shop now! You’ll be glad you did. Send me an e-mail at artmangreg@aol.com with your choice from the list below, and I will send you a Paypal link so you can prepay for your order. Items will take 2-3 weeks to knit and ship, so ordering early is essential to receive in time for the holidays! Last date you can order from this list is 11/11/11. All yarn used is Lion Brand (or equivalent) acrylic, unless noted. Photos are for suggestion only; actual knitted items may vary slightly in color or design. You may request a photo of an item that doesn't have the photo here:


Adult hat and scarf sets (not sold individually) one solid color or two color: $40.


Child hat and scarf sets (not sold individually) one solid color or two color: $35.


Child hat with pom pom and scarf sets (not sold individually) one solid color or two color: $40.


Newborn baby hat and booties set (pink, white, yellow or blue): $25.


Adult or child watermelon novelty hat and scarf set (in sizes above, not sold individually): $45.


Teddy bear (pink, blue or brown): $25.


Sunflower air freshener: $20.


Glass Christmas ball ornaments with Christmas tree inside – set of 4 (family heirloom quality – each gift can have individual gift tags with your family’s names on them – up to 6 different names): $45.


Glass Christmas ball ornaments with Christmas wreath inside – set of 4: $30.


Knit Christmas ball ornaments – set of 4: $20.


Baby Daffodil Christmas Ornaments – set of 6: $25.


Mini Christmas stocking ornaments (stuff with a peppermint stick and attach to your Christmas gifts, or trim your tree with them!) set of 4: $22.


Glow in the Dark stars – set of 6: $30. (made with special glow in the dark yarn)


Cupcake: $15.

Thursday, September 15, 2011

New Steering Wheel Cover

I needed another steering wheel cover for a green minivan, and since the last one I made came out so well (see here for pics and directions: http://loomdude.blogspot.com/2011/06/fathers-day-gift-idea.html), I decided to make my own:


Here is a detail of the stitching. I used 1 over 1 stockinette, double stranding (1 strand of Sugar 'n Cream Green Twists and 1 strand of Lion Brand Hometown USA Oklahoma City Green), and knit off 110 rows on 10 pegs on the flower loom:

These steering wheel covers are simple to make; the only bit of a challenge comes when you have to sew the cover onto the steering wheel. This can take time, but it is well worth the end result. I suppose if you wanted to use velcro strips instead of sewing the cover on, it would probably work, but you would need to knit on 12 pegs instead of 10. I knew I wanted to use green yarn, but I didn't want something too pastel or deep green. Combining the Sugar 'n Cream with the Hometown USA provided just the look I wanted: variety without being too busy. What do you think?

Monday, September 5, 2011

Oh my Stars!

I’m a little late posting due to Hurricane Irene blowing through NJ and having the power off for several days. You can read more about my hurricane experience here: (http://artmangreg.blogspot.com/2011/09/my-hurricane-irene-story.html). For now, I’d like to post the latest project: stars!


They are relatively easy to make, and I will have the complete directions in my upcoming book. In the meantime, I used the Bernat Glow in the Dark yarn on the flower loom for the small star and the blue round loom for the large star.


Knitting the stars doesn't take long, but shaping them afterwards will require a little nimble effort with the yarn needle. This time I dunked the completed stars in the fabric stiffener and saturated them before I placed them on a plastic bag, shaped and blocked them. After a couple of days they were both dry. They are perfect to hang in a child’s bedroom as a sweet little electricity-free night light! You might consider involving your child with creating a mobile using a coat hanger and some string, to hang the stars and make them seem as if they are floating in the child’s room. Along with the firefly I posted last month, your child’s room will be full of glowing nighttime novelties in no time!


Naturally, the camera was not steady for such a long exposure to capture the glow effect.